Wednesday, 24 August 2016

CRM Automate build Solution using Powershell commands

  • In CRM if there is any solution movement from other enviornment like DEV,PROD,STG we use to export the solution and import the solution to the respective environment by logging into MS Dynamics CRM.
  • This will tends to extra effort to do manually for developers or release managers.

  • So what if release user or test user can build and deploy the Solution deployment without CRM intervention(CRM loggin in)

  • We need to do some automate build and deployment.
  • In this article i write about how Import/Export solution automate to the various environment without intervention of logging into MS Dynamics CRM.
  • XRM CI Framework,this is one tool use to automate the build in CRM

      Below link is for download the XRM CI Framework


Download and extract the ZIP file .

First HelloWorld example “WhoAmIRequest”


1.Open "Powershell" and "Run as a Administrator"

2.Navigate to Extracted path and click PowerShell folder and set the Path to "C:\Users\subramanis\Desktop\CRM\CRM_SolutionAutomate\PowerShell"

3.Execute the below command
Import-Module ".\Xrm.Framework.CI.PowerShell.Dll"

Error:
Access Denied or Unable to load assembly error will occur
For Access denied ,make sure you have permisson to allow and Right click the Xrm.Framework.CI.PowerShell.Dll and unblock the dll
For Assembly unable load error,Execute the step no:3 in Powershell Version 2

4. Set the connection string of Online
Below is the format

//$con is variable,ServiceUri is the name of the connectionstring
$con="ServiceUri=https://2016crm123.crm.dynamics.com;Username=subramanicrm2016@2016crm123.onmicrosoft.com;Password=pass@123;"
//select-WhoAmI is the request pass to the service
//-ConnectionString is the set connectionstring to the request
//$response- result of the request data
//$response.UserId returns respective userid(GUID)
$response= select-WhoAmI -ConnectionString $con -Verbose
$response.UserId

After execute the query it will retun the GUID of the user which means we can able to access the data without logging into CRM

You could also invoke the Cmdlet with the –Verbose switch so it can give more information as it is executing.

Export the Solution using Power shell


  • You can use the Windows PowerShell ISE “powershell_ise.exe” to create your PowerShell Script. This provides Syntax highlighting and allows you to debug your PowerShell scripts.Let’s start. Declare any parameters you might need. These will make your script re-usable. For example in this case I am going to declare the connection string as a parameter, this will allow me to export my Sample solution from multiple environments.

  • Load the xRM CI Framework similar to what I have done in the first post. In this case the script is loading the PowerShell Module from the same directory to which I will be saving my script. Feel free to store the xRM CI Framework in a shared location and reference that location from your scripts.
  • Finally the important part. Use the “Export-XrmSolution” to export your Solution. In this case I am exporting the “Sample” solution to “C:\Temp” as managed. There are some optional parameters that you can still pass to this Cmdlet to specific other export options. Now your script should be ready see below.

  • Save the script to the same directory as the PowerShell assemblies and call it “ExportSampleSolution.ps1”


Let’s execute the script using PowerShell. You just need to pass the connection string as a parameter to this script.

Import Solution using powershell in CRM

Run the below command in the Powershell

Import-XrmSolution -ConnectionString "https://2016crm123.crm.dynamics.com;Username=subramanicrm2016@2016crm123.onmicrosoft.com;Password=pass@123;" -SolutionFilePath "C:\Temp\filename.zip" -PublishWorkflows $true -ConvertToManaged $false -OverwriteUnmanagedCustomizations $true ImportAsync $true -WaitForCompletion $true


Note:Manged solution should be imported as Manged solution


Wednesday, 25 May 2016

How to show Filtered Lookup Dialog in Dynamics CRM through Script

How to show Filtered Lookup Dialog in Dynamics CRM through Script

t
We had a requirement where in we were supposed to show a Filtered Custom Lookup on form load. By Filtered Custom Lookup, it meant that we were supposed to create a Lookup dialog similar to CRM Filtered lookup (Filtered Lookup value changes on the basis of other Lookup on which it is dependent) dialog. The lookup has to be filtered on the basis of a value in the lookup field which was there on the form.
Now the question was, how were we supposed to achieve this? We had already done a Lookup Dialog to show all the records for an entity, but this was something new and enthralling.
We dived into it and after a few hours of R&D, we came up with a solution. This blog is entirely dedicated in explaining and implementing that solution.
Let us begin with our entity structure which comprised of an entity called Contractor and it was in N:1 relation with Project and Payment Schedule where as Payment Schedule was in N:1 relation with Project.
The requirement was to show the Filtered Custom Lookup dialog containing Payment Schedule records, related to the Project (Lookup field) selected on the Contractor, on form load of Contractor.
Screenshots:
Note: Lookup Dialog seen in the below screenshots is a Custom Lookup Dialog opened on form load using JavaScript.
Below screenshot shows the Project selected as Test Project having Payment Schedule records for it as a result of which we can see that record in the Lookup Dialog.
Test Payment Schedule
Below screenshot shows the Project selected as Test Project 2 and Test Project 2 has no Payment Schedule records for it and as a result we cannot see any records in the Lookup Dialog.
Payment Schedule Lookup View
Let’s start with the technical part of it.
Code:
//function to open filtered entity lookup to select record
function openFilteredLookup(defaultType, defaultViewId, currentObjectType, currentId, rDependentAttr, rId, rType, relationshipId) {
var functionName = “openLookup”;
try {

if (isValid(currentObjectType) && isValid(currentId)) {
//prepare lookup url
var url = “/_controls/lookup/lookupinfo.aspx?AllowFilterOff=0&DefaultType=” + defaultType + “&DefaultViewId=%7b” + defaultViewId + “%7d&DisableQuickFind=0&DisableViewPicker=1&IsInlineMultiLookup=0&LookupStyle=single&ShowNewButton=1&ShowPropButton=1&browse=false&currentObjectType=” + currentObjectType + “&currentid=%7b” + currentId + “%7d&dType=1&mrsh=false&objecttypes=” + defaultType + “&rDependAttr=” + rDependentAttr + “&rId=%7b” + rId + “%7d&rType=” + rType + “&relationshipid=” + relationshipId + “”;
} else {
//prepare lookup url
var url = “/_controls/lookup/lookupinfo.aspx?AllowFilterOff=0&DefaultType=” + defaultType + “&DefaultViewId=%7b” + defaultViewId + “%7d&DisableQuickFind=0&DisableViewPicker=1&IsInlineMultiLookup=0&LookupStyle=single&ShowNewButton=1&ShowPropButton=1&browse=false&dType=1&mrsh=false&objecttypes=” + defaultType + “&rDependAttr=” + rDependentAttr + “&rId=%7b” + rId + “%7d&rType=” + rType + “&relationshipid=” + relationshipId + “”;
}

//Set the Dialog Width and Height
var DialogOptions = new Xrm.DialogOptions();
//Set the Width
DialogOptions.width = 500;
//Set the Height
DialogOptions.height = 550;

//open dialog
Xrm.Internal.openDialog(Mscrm.CrmUri.create(url).toString(), DialogOptions, null, null, CallbackFunction);

//Set the variable to false
isOnLoad = false;

} catch (e) {
throwError(e, functionName);
}
}
What are the parameters passed for the above used function?
  • defaultType = Object Type Code of the entity which needs to be shown in the Lookup.
  • defaultViewId = GUID of the defaultView which will be set for the Look In section of the Lookup Dialog, in order to get the defaultView GUID, you can use the following code :
//Get the Default View id
Xrm.Page.getControl(controlName).getDefaultView().replace(“{“, “”).replace(“}”, “”).trim();
    • controlName: It is the name of the Lookup Control.
  • currentObjectType = Object Type Code of the current entity.
  • currentId = GUID of the current record.
  • rDependentAttr = new_contractor.new_projectid
    As the name suggest it`ll give the attribute on the basis of which lookup is filtered.
    The above rDependentAttr value is used in our current demo.
    • new_contractor: It is the name of the current entity.
    • new_projectid: It is the control/attribute name on the basis of which the Lookup is filtered.
  • rId = It is the GUID of the record selected in the new_projectid field.
  • rType = It is the Object Type Code of the new_projectid.
  • relationshipId = new_new_project_new_paymentschedule.
It is the relationship name of how the Project and Payment Schedule entities are related.
Note:
  1. We can retrieve Entity Metadata to get the Object Type Code of any entity.
  2. The above method is an unsupported method to get the Lookup.
  3. How to use Xrm.Internal.openDialog method?

Filter Lookup based on Form field


function onLoad()
{
    addEventHandler();
}

function addEventHandler() {
    // add the event handler for PreSearch Event
    Xrm.Page.getControl("parentcontactid").addPreSearch(addFilter);
}

function addFilter() {
   //find contact contains this @example.com
   var email = "%@example.com%";

    //create a filter xml
   var filter = "<filter type='and'>" +
                "<condition attribute='emailaddress1' operator='like' value='" + email + "'/>" +
                 "</filter>";

    //add filter
    Xrm.Page.getControl("parentcontactid").addCustomFilter(filter);
}

Tuesday, 24 May 2016

Dynamically Disable Ribbon Buttons in Dynamics CRM

Dynamically Disable Ribbon Buttons in Dynamics CRM

Today I had to dynamically disable a custom Ribbon button.  My rule needed to be based on fields on the form and based on the form mode.  I only want the button enabled on the Update form and only when a certain checkbox is checked.
Here’s the steps.  These will work for CRM 2011 Ribbon buttons or CRM 2012 Command Bar buttons.
To modify the CRM Ribbon / Command Bar I use the excellent Ribbon Workbench tool from Develop 1.  To use this tool download their solution file, import it into CRM and then open the Solution.  The Ribbon Workbench UI will launch.  You will be prompted to open a solution.   For best performance it pays to create a temporary solution that contains just the entity you wish to customize and the JavaScript web resources you need to refer to (if applicable).
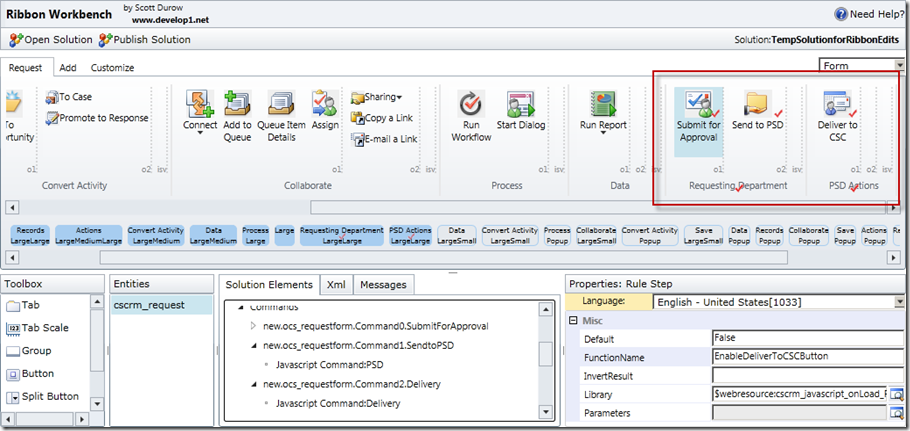
Here’s my custom Ribbon buttons as seen in Ribbon Workbench:
image
You add custom ribbon buttons by dragging a “Button” from the Toolbox in the bottom left corner of the screen up into the ribbon.   Then you set the Button properties through the Property window on the right and define the Button’s Command through the Solution Elements tab in the bottom middle of the screen.
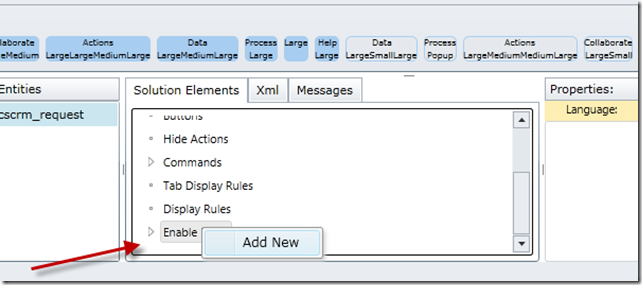
Back to our dynamic rule.  First step is to define an Enable Rule.  This is done from the Solution Elements tab.  Right-click on Enable Rules and select Add New:
image
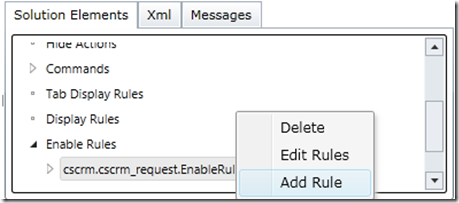
Click the arrow to expand Expand Rules, you will see a new Rule listed:
image
Right-click on the Rule and select Add Rule:
image
Up will pop a bunch of Rule types for you to pick from.  You can chose options here if you want your Button to be enabled only for certain form modes, or in say the Outlook Client but not the Web Client.   In my case I want to control the state of my button based on the results of a JavaScript function so I’m going to choose “Custom Javascript Rule”:
image
Next, click on the CustomRule and then complete the Properties on the right.  The important properties here are the Java Script Web Resource library (which will need to be contained in the Solution file you selected when Ribbon Workbench launched) and the FunctionName:
image
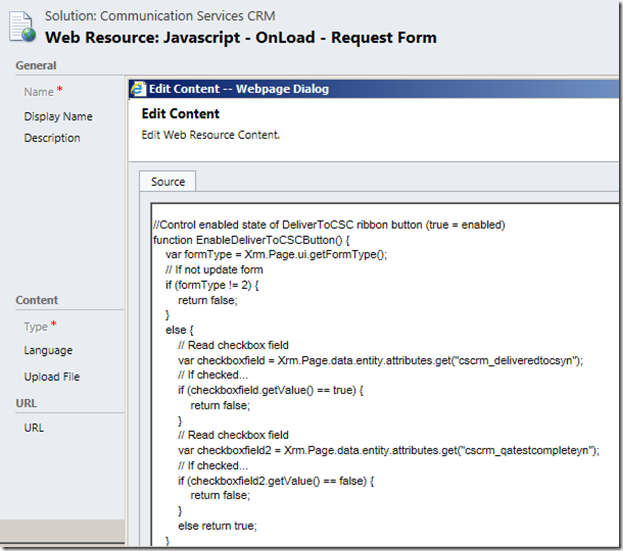
So, obviously, those properties need to match to an actual JavaScript function you have loaded into CRM via a Web Resource.  Here’s mine:
image
The JavaScript function can execute any logic you like, it just needs to return true or false.  A value of true will result in the Enabling of the button, false will Disable it.
One last bit, we need to add the Enable Rule to the Command tied to the Button.   This is also done from the Solution Elements tab.  I already had a Command defined so I just right-click on it and select Edit Enable Rules:
image
Up pops a Rule selector, simply select your rule and push it over to the right via the Add > button:
image
If you didn’t have a Command defined for your Button you would need to right-click on Commands in the Solution Elements tab and select Add New and then add the Enable Rule.  And you would need to select the Command you created back in the Button’s properties.
Last step is to Publish the changes:
image
And that’s it.  The approach for dynamically changing the display state of a button is almost identical so you are not an expert in that too.
Happy ribboning.
Oh and yes this is all the same in CRM 2013:
image

Monday, 16 May 2016

Considerations for CRM and SQL Server

Performance

Implementing a fully-integrated marketing automation solution like ClickDimensions can reveal areas of your CRM deployment that require optimization. Depending on your usage of different feature areas of ClickDimensions, the volume of both data and queries against the CRM system can increase significantly. While ClickDimensions has no direct interaction with the SQL Server in a CRM deployment, poor SQL Server performance will impact the entire CRM deployment as well as the performance of integrated systems like ClickDimensions.

Recommendations:

  1. Apply the latest update rollups for CRM and the most recent version of ClickDimensions.
    – CRM versions, updates and build numbers can be found on Microsoft’s Premier Field Engineering blog.
    – Sign up to be notified about new versions of ClickDimensions here.
  2. If you use CRM on-premise, make sure you have a regular maintenance plan established for your SQL Server. The maintenance plan should reorganize and rebuild indexes, update statistics, and release cleared space.
  3. Architect your CRM on-premise deployment to meet the needs of your organization’s usage and planned integrations, including such steps as using a multi-server deployment model to separate the web application and data tiers to separate servers. With SQL Server running on its own server(s), another option for optimization in high-volume environments is to configure SQL’s log files to reside on a separate physical disk from the data files to reduce disk contention for I/O operations. Additionally, if your SQL Server is virtualized, be sure that the data files are not sharing a SAN or other storage with other virtual machines.
  4. Implement the optimization techniques described by Microsoft in these whitepapers:
    (Optimizing CRM and SQL: http://www.microsoft.com/en-us/download/details.aspx?id=27139)
    (Two whitepapers on security modeling and customization considerations for performance:https://www.microsoft.com/en-us/download/details.aspx?id=45905)
    In particular, many CRM customers have seen significant performance improvements with the following two optimizations:
    – “EnableRetrieveMultipleOptimization” registry key for CRM (especially for CRM 2011 pre-UR10)
    – Setting the Max Degrees of Parallelism for SQL ServerBoth of these are discussed in Microsoft’s white paper and are applicable to on-premises deployments of both CRM 2011 and CRM 2013.
  5. Enable WCF compression for an on-premises CRM deployment
  6. Bandwidth: ClickDimensions integration requires a high-speed internet connection. If you have CRM installed on-premise, a minimum 10Mbps connection is recommended (up/down). Greater volumes of email may require increased bandwidth for the CRM server’s internet connection.
  7. Consider data retention needs. It may be helpful to periodically clean out old data that is no longer relevant to your users. This will vary from company to company, but some general guidelines are discussed in an article on the ClickDimensions blog. To plan for database growth, use this very approximate rule of thumb: For each 1 million emails sent, expect 1.5-2 GB of additional storage space for your database. (This can vary on how emails are sent – either bulk emails or many individual emails from workflow or nurtures – and how much website traffic you are tracking, etc.)
  8. CRM limitations: Microsoft CRM 2011, 2013 and CRM Online have a built-in limitation that restricts the maximum number of records that can be returned for many types of queries to a total of 50,000. This is called the AggregateQueryRecordLimit. For CRM on-premises, this limit can be adjusted by your CRM partner or administrator using the CRM SDK, PowerShell, or a direct update to the OrgSettings table in the CRM database. If this limit is not changed, you will see errors when trying to send an email to more than 50,000 recipients. This setting cannot be changed in CRM Online.
    – See here for PowerShell instructions: http://msdn.microsoft.com/en-us/library/2a4061cd-e6b4-4672-8c44-20a27c523718#use_powershell_advanced
    – And here for documentation of this setting: http://msdn.microsoft.com/en-us/library/gg334634.aspx
  9. Use dynamic marketing lists cautiously. Dynamic marketing lists in CRM 2011 and CRM 2013 are very resource intensive in CRM compared to static lists. If you expect to use dynamic lists for large recipient lists, make sure your CRM database server is well-optimized.
  10. Limit the number of unsubscribe records you import into CRM from a previous vendor. When transitioning from a previous vendor, you may wish to retain the suppressed email addresses that your previous vendor no longer sends to (for example, if the email address is invalid). You can do this by importing these addresses in the ClickDimensions “Unsubscribe” entity in CRM. However, it is important to note that for bulk Email Sends, ClickDimensions will retrieve all of the unsubscribe records in your CRM in order to remove the unsubscribes from the list of recipients. If you have many thousands of unsubscribes or known bad email addresses that you wish to migrate into CRM from your previous email marketing vendor, you will get better performance by instead updating the field “Allow Bulk Email” to “Do Not Allow” directly on the Contact or Lead record, rather than creating new Unsubscribe records. If ClickDimensions must retrieve tens of thousands or hundreds of thousands of Unsubscribe records, this will add a lot of overhead and processing time to each Email Send.

Dynamics CRM 2011 Vs CRM 2013 Vs CRM 2015

Features
CRM 2011
CRM 2013
CRM 2015
User Interface
  • Contextual Ribbon Bar.
  • CRM Functional groups like Sales, Services, Marketing, Workplace etc. are at bottom left of the home screen.
  • Pop up windows are more.
  • Ribbon Bar is replaced by top Command Bar
  • CRM functional groups are now at the top of the CRM home screen.
  • No pop up windows.
  • Top Command Bar
  • CRM functional groups are now at the top of the CRM home screen.
  • No pop up windows
  • More space for customer data
Workflows
Asynchronous
Asynchronous/ Synchronous(Real time).

The existing workflow execution model that supports asynchronous workflows has been extended to support real-time (synchronous) workflows. Real-time workflows are not queued, as was the case with asynchronous workflows, but execute immediately on-demand or in response to a message being processed by the execution pipeline. Real-time workflows participate in the database transaction and perform similar functionality to plug-ins, yet can be created by a non-developer through the web application workflow designer. Developers can still create real-time workflow through code.
Asynchronous/ Synchronous(Real time)
Duplicate Detection Rule
Available
Removed
Removed
Auto Save
Not Available
Auto Save of Record is Available & this option can also be disabled in settings.
Quick Create
Not Available
Available. Now any type of record type created being in another record.
Portable Business Logic/Rules
Not Available.
Only Custom javascipt.
Introduced.

Business rules in CRM 2013 now allows for native controls to be applied on forms instead of writing custom JavaScript as it was the case in previous version. These are client side enforced controls based on business conditions and allows for 5 actions:
Set specific field value (including formulas & calculation),
Set business required state for a CRM attribute,
Set visibility of a field to visible or invisible (visible = false),
lock and unlock Dynamics CRM fields / attributes, and
Show an error message on a form if certain conditions are met.
Enhanced.

Complex condition branching added.
Business Process Flow (BPF)
Limited to Lead, Opportunity, Case entities.
For any entity now BPF is enabled.

Dynamics CRM 2013 gives users visual guidance to navigate processes that makes workflows more prescriptive and easier to follow.New process bar prompts users to follow next action steps in line with your mapped workflows to progress leads, opportunities, service cases and other tasks.
For any entity now BPF is enabled.
Business Processes also have Stage-Gating feature that prevents users progressing any process to the next stage if one or more steps haven’t been completed
Mobility Form
  • Javascript not supported
  • Custom entity not supported
  • Javascript supported
  • Custom entity supported
  • Javascript supported
  • custom entity supported.
Server Sync.
Email router
Server Side Sync.
No Email Router
Server SIde Sync
Adv Find
Under, Not-under filter not present.
Under, Not-under filter criteria is introduced.
Social Enterprise Collaboration
Not available
Introduced.
Users can participate in social conversations directly within Microsoft Dynamics, through the Yammer web and desktop applications as well as apps running on Microsoft (Windows Phone), Apple (iOS) and Google (Android) mobile devices.
Enhanced
Prominent Records Headers & Quick View Forms
Not available
Introduced.
Surfaces important Customer information and highlights key data (such as phone number, status, record owner) on related forms so users always have their customer data at their fingertips.
Enhanced
Get Started Pane
Introduced
Removed
Removed
Workplace Area Navigation
Available
Removed
Removed
Inline Data Editing
Not Available
Introduced
Available
Global Search
Not available
Introduced
Enhanced
Image DataType
Not Available
Introduced
Available
Actions
Not Available
Introduced.
Developers can extend the functionality of the standard Microsoft Dynamics CRM system by creating custom messages, with associated request/response classes, known as actions. Actions are new type of processes to expand the vocabulary available for developers to express business processes. With core verbs like Create, Update, Delete, Retrieve, Associate and Assign provided by the system, an action uses those core verbs to create more expressive verbs like Escalate, Approve, Route, and Schedule. If the definition of the action needs to change due to changing business priorities, someone who is not a developer can edit the action using the application workflow designer. Since these actions are available through web service calls, they can be used from both inside the application using a command action or from external applications.
Available
Integrated Maps
NotAvailable
Introduced.
Integrated Bing Maps dynamically show the map for the primary record address.
Available
Skype & Lync Integration
Not Available
Introduced.
Skype and Lync integration enabling direct dialling from any phone number field in Dynamics CRM.
Available
Access Team
Role-Based Security (owner) Teams Only
Role-Based Security Teams (owner Teams) and Access Teams.
Teams need to collaborate with a unique set of people within their organization for each record such as an Opportunity, order or important customer contact. CRM 2011 role-based security does not give users this level of flexibility. With a record-based access team, CRM users can be added to a specific record and give them access. The access team is a new type of team that doesn’t own records, but, has access to records. Unlike with owner teams, you can create one or more access teams to work on the same records and have team members with different levels of access rights to the record.
Hierarchy Security Model Introduced.

New hierarchical visualizations and roll-ups bring real-time territory and forecasting data to your fingertips. Users now have a way to view accounts, products, and users that helps you see how info is related.  CRM 2015 can display how data is related or grouped by accounts, products, or users in hierarchical charts. The user can pick a data set to get more details and navigate to the info you're interested in.
Calculations and formulas via Business Rules
Not Available
Available.
Setting a field value in a business rule allows the use of formulas to do calculations for applicable fields such as fields of type “Money”. Addition, subtraction, multiplication & division are the calculation operations available and can be done between fields or values. So for example: set “Total Box Value” field value to “Price per item” field multiplied by “24”. (assuming every box has 24 identical items for instance).
Available.

Rollup fields.
calculated fields
Web Services & Endpoints
Support for CRM 4.0 2007 Endpoint & Legacy features
CRM 4.0 Service Endpoints & Features removed in CRM 2013
CRM 4.0 Service Endpoints & Features removed in CRM 2015
Inline Editable Grids
Not Available
Introduced.
Available
Product Bundling
Not Available
Not Available
Introduced.
Products can be bundled and offered as packages, for discounts and offers
Regional Price List
Not Available
Not Available
Introduced.
Products can be bundled and offered as packages, based on regional requirements and assessments
Import/ Export Product
Not Available
Configuration migration tool introduced in Dynamics CRM 2013
Improved.
support product migrations in Dynamics CRM 2015
Guided Sales Flow
Limited to Lead, Opportunity, Cases
Improved for all entities.
Improved to have complex business processes.
Conditional branching has brought about more specificity to business processes
Offline Draft Capability
Not Available
Not Available
Offline draft capabilities on mobile devices which are synced when the user is back online
Pause & Resume SLA’s
Not Available
Not Available
Pause and Resume SLAs to track time efficiently through system settings
Themes
Not Available
Not Available
Introduced.
You can now brand your CRM! Themes offer the option of changing the default colors and adding your logo to the top navigation as pictured below. This is just one more way to customize CRM to match the uniqueness of your organization.
OneNote Integration
Not Available
Not Available
Introduced.
Users can now easily capture meeting details using OneNote from within CRM Online. This functionality allows the information to be available to other CRM Online users in the Social Pane.
Advance Find Older Than Filter
Not Available
Not Available
Introduced.
Export to Excel Redesign
Only allows to save as excel in local computer. Limiting record 10000.
Record Limit increased to 100000 or 32 MB.
Import excel opens online facility.

Resolving Dynamics 365 Contact Sync Issues in Outlook – ExchangeSyncIdMapping Overload Introduction Recently, our project encountered a ...